PXE (Preboot eXecution Environment) Server allows unattended or automated OS installation over the Network.The main benefit of pxe is that we don’t need any bootable drive to boot OS(Operating system) and we do not need to to burn any ISO file into DVD or usb device.
Once the PXE server is configured we can install hundreds of System at the same time over the network.As it works on Client-Server architecture, to get the OS installation on clients, boot the clients via PXE option.
In this article i am going to setup PXE Server on CentOS 7.x and then will try to install OS on the client using pxe boot.
Below are details of my Setup :
- Server IP = 172.168.1.11
- Host name = pxe.example.com
- OS = CentOS 7.x
- SELinux = enabled
- Firewall = enabled
Step:1 Install required packages for PXE Setup
To install and Configure pxe server on centos 7.x we need the following packages “dhcp, tftp-server, ftp server(vsftpd), xinted”. Open the terminal execute beneath command :
[root@pxe ~]# yum install dhcp tftp tftp-server syslinux vsftpd xinetd
Step:2 Configure DHCP Server for PXE
When we install dhcp package then a sample configuration file of dhcp server is created at “/usr/share/doc/dhcp*/dhcpd.conf.example“, though the configuration file of dhcp is at ‘/etc/dhcp/dhcpd.conf’.
Copy the following lines into the file ‘/etc/dhcp/dhcpd.conf’, replace the ip subnet and other details as per your environment.
[root@pxe ~]# vi /etc/dhcp/dhcpd.conf

# DHCP Server Configuration file.

ddns-update-style interim;
ignore client-updates;
authoritative;
allow booting;
allow bootp;
allow unknown-clients;

# internal subnet for my DHCP Server
subnet 172.168.1.0 netmask 255.255.255.0 {
range 172.168.1.21 172.168.1.151;
option domain-name-servers 172.168.1.11;
option domain-name "pxe.example.com";
option routers 172.168.1.11;
option broadcast-address 172.168.1.255;
default-lease-time 600;
max-lease-time 7200;

# IP of PXE Server
next-server 172.168.1.11;
filename "pxelinux.0";
}
Step:3 Edit and Config tftp server (/etc/xinetd.d/tftp)
TFTP (Trivial File Transfer Protocol ) is used to transfer files from data server to its clients without any kind of authentication. In case of PXE server setup tftp is used for bootstrap loading. To config tftp server, edit its configuration file ‘ /etc/xinetd.d/tftp’, change the parameter ‘disable = yes‘ to ‘disable = no’ and leave the other parameters as it is.
[root@pxe ~]# vi /etc/xinetd.d/tftp
service tftp
{
 socket_type = dgram
 protocol    = udp
 wait        = yes
 user        = root
 server      = /usr/sbin/in.tftpd
 server_args = -s /var/lib/tftpboot
 disable     = no
 per_source  = 11
 cps         = 100 2
 flags       = IPv4
}
All the network boot related files are to be placed in tftp root directory “/var/lib/tftpboot”
Run the following commands to copy required network boot files in ‘/var/lib/tftpboot/’
[root@pxe ~]# cp -v /usr/share/syslinux/pxelinux.0 /var/lib/tftpboot
[root@pxe ~]# cp -v /usr/share/syslinux/menu.c32 /var/lib/tftpboot
[root@pxe ~]# cp -v /usr/share/syslinux/memdisk /var/lib/tftpboot
[root@pxe ~]# cp -v /usr/share/syslinux/mboot.c32 /var/lib/tftpboot
[root@pxe ~]# cp -v /usr/share/syslinux/chain.c32 /var/lib/tftpboot
[root@pxe ~]#
[root@pxe ~]# mkdir /var/lib/tftpboot/pxelinux.cfg
[root@pxe ~]# mkdir /var/lib/tftpboot/networkboot
root@pxe ~]#
Step:4 Mount CentOS 7.x ISO file and copy its contents to local ftp server
In my case i have already downloaded CentOS 7.x iso file on my PXE Server. Run the beneath commands to mount iso file and copy its contents in ftp server’s directory ‘/var/ftp/pub’
[root@pxe ~]# mount -o loop CentOS-7-x86_64-DVD-1511.iso /mnt/
mount: /dev/loop0 is write-protected, mounting read-only
[root@pxe ~]# cd /mnt/
[root@pxe mnt]# cp -av * /var/ftp/pub/
Copy Kernel file (vmlimz) and initrd file from mounted iso file to ‘/var/lib/tftpboot/networkboot/’
[root@pxe ~]# cp /mnt/images/pxeboot/vmlinuz /var/lib/tftpboot/networkboot/
[root@pxe ~]# cp /mnt/images/pxeboot/initrd.img /var/lib/tftpboot/networkboot/
[root@pxe ~]#
Now you can unmount the iso file using ‘umount’ command
[root@pxe ~]# umount /mnt/
[root@pxe ~]#
Step:5 Create kickStart & PXE menu file.
Before creating kickstart file, let’s first create the root password in an encrypted string because we will using that encrypted password string in kickstart file.
[root@pxe ~]# openssl passwd -1 Pxe@123#
$1$e2wrcGGX$tZPQKPsXVhNmbiGg53MN41
[root@pxe ~]#
System default kickstart file is placed under /root with name ‘anaconda-ks.cfg’. We will be creating a new kickstart under the folder /var/ftp/pub with the name ‘centos7.cfg’
Copy the following content into the new kickstart file. Please modify the kickstart file as per your needs.
[root@pxe ~]# vi /var/ftp/pub/centos7.cfg

#platform=x86, AMD64, or Intel EM64T
#version=DEVEL
# Firewall configuration
firewall --disabled
# Install OS instead of upgrade
install
# Use FTP installation media
url --url="ftp://172.168.1.11/pub/"
# Root password
rootpw --iscrypted $1$e2wrcGGX$tZPQKPsXVhNmbiGg53MN41
# System authorization information
auth useshadow passalgo=sha512
# Use graphical install
graphical
firstboot disable
# System keyboard
keyboard us
# System language
lang en_US
# SELinux configuration
selinux disabled
# Installation logging level
logging level=info
# System timezone
timezone Europe/Amsterdam
# System bootloader configuration
bootloader location=mbr
clearpart --all --initlabel
part swap --asprimary --fstype="swap" --size=1024
part /boot --fstype xfs --size=300
part pv.01 --size=1 --grow
volgroup root_vg01 pv.01
logvol / --fstype xfs --name=lv_01 --vgname=root_vg01 --size=1 --grow
%packages
@^minimal
@core
%end
%addon com_redhat_kdump --disable --reserve-mb='auto'
%end
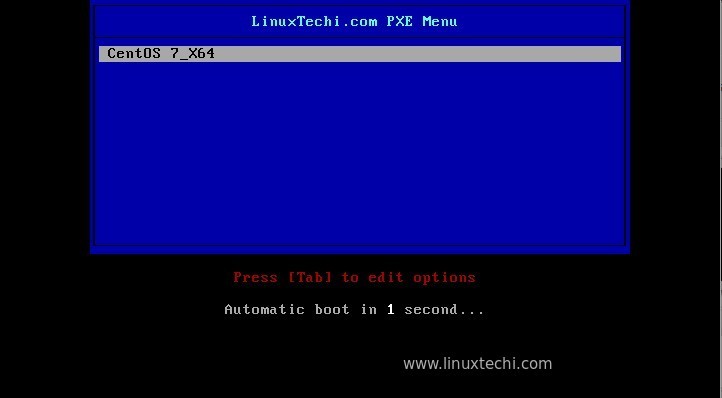
Create a PXE menu file (/var/lib/tftpboot/pxelinux.cfg/default), copy the following contents into the pxe menu file.
[root@pxe ~]# vi /var/lib/tftpboot/pxelinux.cfg/default

default menu.c32
prompt 0
timeout 30
MENU TITLE LinuxTechi.com PXE Menu
LABEL centos7_x64
MENU LABEL CentOS 7_X64
KERNEL /networkboot/vmlinuz
APPEND initrd=/networkboot/initrd.img inst.repo=ftp://172.168.1.11/pub ks=ftp://172.168.1.11/pub/centos7.cfg
Step:6 Start and enable xinetd, dhcp and vsftpd service.
Use the beneath commands to start and enable xinetd, dhcp and vsftpd.
[root@pxe ~]# systemctl start xinetd
[root@pxe ~]# systemctl enable xinetd
[root@pxe ~]# systemctl start dhcpd.service
[root@pxe ~]# systemctl enable dhcpd.service
Created symlink from /etc/systemd/system/multi-user.target.wants/dhcpd.service to /usr/lib/systemd/system/dhcpd.service.
[root@pxe ~]#
[root@pxe ~]# systemctl start vsftpd
[root@pxe ~]# systemctl enable vsftpd
Created symlink from /etc/systemd/system/multi-user.target.wants/vsftpd.service to /usr/lib/systemd/system/vsftpd.service.
[root@pxe ~]#
In Case SELinux is enabled, then set the following selinux rule for ftp server.
[root@pxe ~]# setsebool -P allow_ftpd_full_access 1
[root@pxe ~]#
Open the ports in the OS firewall using following firewall-cmd commands
[root@pxe ~]# firewall-cmd --add-service=ftp --permanent
success
[root@pxe ~]# firewall-cmd --add-service=dhcp --permanent
success
[root@pxe ~]# firewall-cmd --add-port=69/tcp --permanent
success
[root@pxe ~]# firewall-cmd --add-port=69/udp --permanent
success
[root@pxe ~]# firewall-cmd --add-port=4011/udp --permanent
success
[root@pxe ~]# firewall-cmd --reload
success
[root@pxe ~]#
Up to this point, PXE server installation and configuration is completed now.
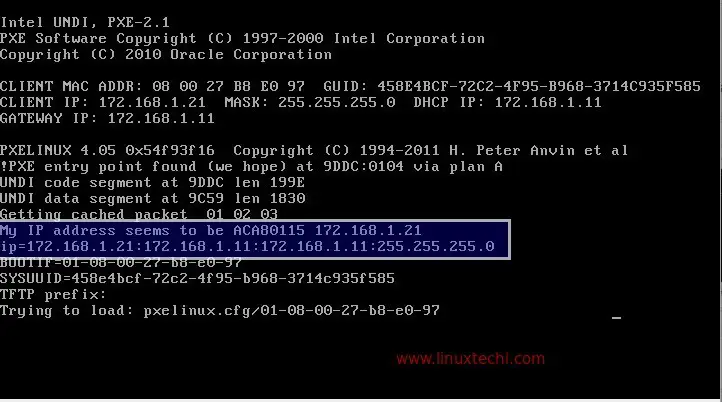
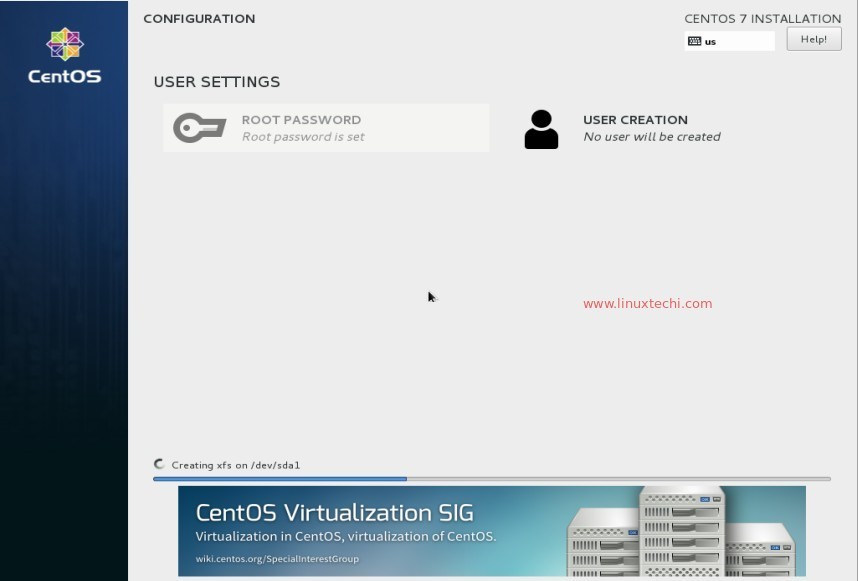
Step:7 Boot the clients with pxe boot option.
As can see above that installation has been started with any human interaction. I hope you enjoy the installation and configuration of PXE server. Please share your feedback and comments.
No comments:
Post a Comment