For the VPN tunnel we used the following topology:

Creating Fortigate VPN Steps:
I. Go to VPN > IPsec ->Auto Key (IKE) and select “Create Phase 1“

II. Enter the following information in Phase1
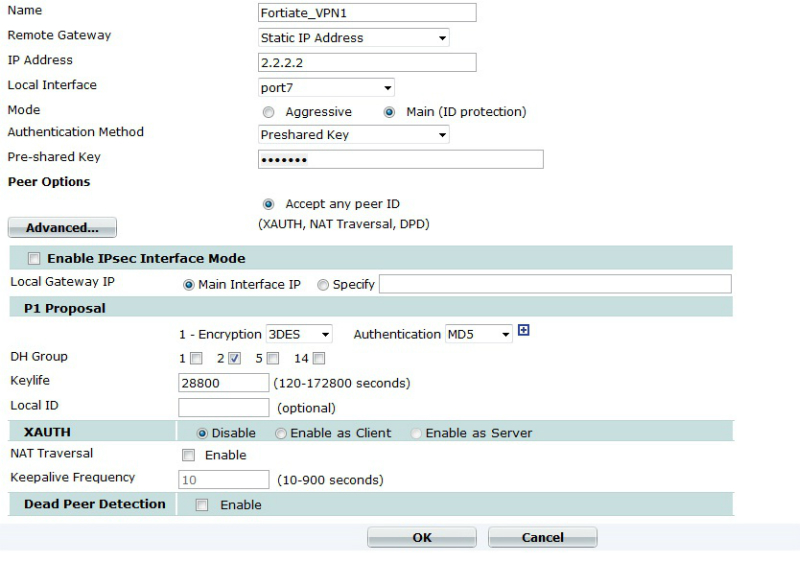
Name: Fortigate_VPN 1- This is a name to identify the VPN tunnel, you must remember this name as it will appear when configuration the Phase2.
Remote Gateway – Enter the static IP of the VPN remote peer. In our example it is “2.2.2.2″
Local Interface – Select the interface that has outside Internet access. In our case we picked “WAN1″. Note: This interface cannot be a loopback interface.
Mode: Main Mode
Authentication: Pre Shared Key -> pick a share key with more than 6 letters.
Click Advanced:
Select the P1 Proposals (we picked):
Encryption: 3DES
Authentication: MD5
DH Group: 2
Keylive: 28800
Local ID: <none>
XAUTH: Disabled
NAT Traversal: Disabled
Dead Peer Detection: Disable – Note:please keep in mind to set this to disabled in case you are peering with another VPN vendor. I have found out that this can break the VPN tunnel
Click “OK”
The VPN Phase1 one was now created successful.
III. Now we need to create VPN Phase2, below are the steps:
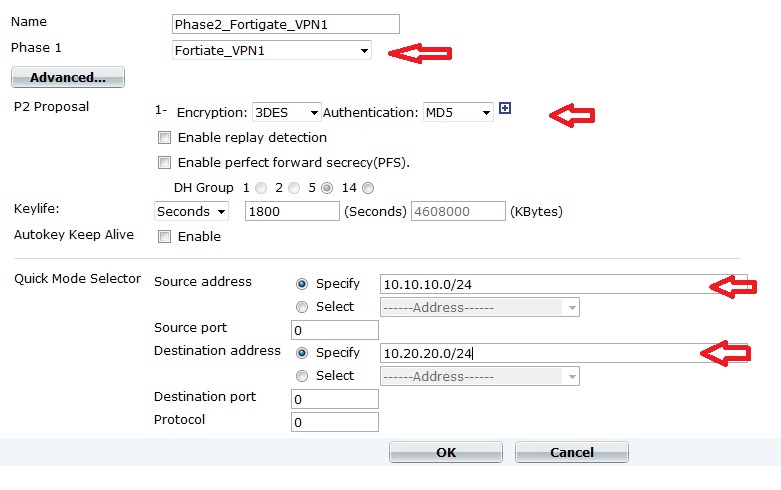
Name: Select a name that suits you, we picked “Phase2_Fortigate_VPN1”
Phase1: Select the name of the Phase1 you created earlier. We picked” Fortigate_VPN1”
Encryption: 3DES
Authentication: MD5
Quick Mode Selector: This describes the IP ranges that you want passing through the VPN.
As in the picture, we picked:
The Source Address: 10.10.10.0/24 , that is behind our Fortigate_1 VPN appliance.
The Destination Address: 10.20.20.0/24. that is behind our Fortigate_2 VPN appliance.
IV. Define VPN Source Selectors
1. Create a firewall address, go to Firewall Objects > Addresses > Address and select “Create New“.
Enter the following information and press “OK“:
Address Name: Sales_Network
Subnet/IP Range: 10.10.10.0/24
2. Create another firewall address( that is behind Fortigate 2) and go to Firewall Objects > Addresses > Address and select “Create New“.
Enter the following information and press “OK“:
Address Name: Remote_Sales_Network
Subnet/IP Range: 10.20.20.0/24
V. Create a Firewall Policy on the Fortigate:
a. Go to Policy > Policy
b. Select Create New
c. Enter the following information and press “OK”
Source Interface/Zone – Select Internal
Source Address Name – Select “Sales_Network”
Destination Interface/Zone – Select WAN1
Destination Address Name – ”Remote_Sales_Network”
Action – IPSEC
VPN tunnel: Fortigate_VPN1
Select ONLY the following option: Allow Inbound and Allow Outbound
Everything should be up and running now.
No comments:
Post a Comment